Wednesday, October 17, 2012

Western Crib - After!

Earlier in the year I started working on this baby crib. It started out plain white and my end goal was to make it look western.

Since it didn't end up being real wood I couldn't sand and stain it like I had originally planned. I then thought I could prime it, do a light brown coat, layer that with a dark brown coat and roughly sand it down to make it look distressed. The problem with that was it just went right down to the first base white coat again which I really didn't like. I repainted it all back to dark brown and decided just to leave it with a finished, non-roughed-up look.

It didn't quite look western to me so I came up with an idea to add stars and rope to the ends. I bought rope from ACE Hardware and I used E600 to glue it on. After I did it I really wish I would have cut all the rope pieces shorter and made them so that it didn't swirl as much toward the center where the stars are. The glue took the paint right off even before it was dry so once it was down there really was no adjusting without having to redo the whole thing.

I found the stars at an antique shop in Bend called the Iron Horse. They were all rusted over but cleaned up great. Both of the stars had tiny rods on the back (similar to a thumb tack), so I drilled holes into the crib and added glue to make them stay.

I think this crib would look great with some pink bedding and I'm hoping it works out great for little Addyson Emily!


& here it is all set up with her absolutely adorable pink & cow print bedding!


Thursday, September 27, 2012

Fresh White Paint

I had some extra time the other day after work & decided to paint!


I love white. I don't think you can go wrong with a fresh coat of white paint on ... pretty much anything! I painted all the cupboards & drawers in our bathroom. I'm a little mad I didn't go with a semi-gloss finish simply because it's easier to wipe down in an area that gets so much use (& to keep the white whiter for longer!)

I still need to throw on another coat ... maybe after work today.


Happy painting!

Thursday, September 6, 2012

Power Sanding

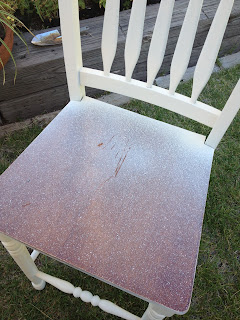
I love nothing more than a good power tool. They tend to make everything so much easier and save a lot of time. My latest project is this chair:


As you can see, I got a little over excited about my last tool (the paint sprayer) & didn't tape/cover the seat before I got to work. The spot where the back of the chair is got the most paint & needed the most sanding ... but it was also the most awkward part to sand. I will have to go back and do some by hand.


I used a 220 grain sandpaper which was just rough enough to strip the paint/previous stain but leave a smooth finish. I can't wait to apply the stain! I think I'm going to get all four chairs prepped before I start that process just so I can make them as uniform as possible.

Tuesday, August 21, 2012

Spray Painting (& not just out of a can!)

It's been almost a year since I bought this table & chairs off Craigslist with every intention to start the project long before now. However, last week I finally cashed in on a Christmas gift I had received - a gift card to Home Depot - & bought a new paint sprayer! (this is the coolest thing ever!)


I figured out quickly that you can't just pour in the paint & start spraying. There is a certain consistency the paint must be in order to actually come out of the sprayer and then form an even, non-speckled coat. Because the paint I bought had a latex base I just added a couple teaspoons of water & gave it a good stir. Had I any patience to actually read the instructions before I started, I would have figured this out a lot easier!

Also, had I any patience, I would have taped off the wood seat before getting started. Here are the "before" & "during" pictures. I need to add another coat of the ivory/cream color, sand the seat down & stain it. (And of course repeat all those steps on the other three chairs and the whole darn table! yikes! no wonder I didn't start this sooner!)

I'm a HUGE fan of the sprayer. After re-doing a crib, I quickly learned how much spray paint can add up! One bottle is about $4 - between the primer, first coat, & second coat I easily spent $50 on paint alone. A gallon of paint on the other hand is less than $20 & will easily be able to cover this entire table, all four chairs, & probably many more projects to come! I can't wait to post "after" pictures!

Friday, June 15, 2012

Welcoming a Little Cowgirl

A couple weeks ago I helped throw a baby shower for a little cowgirl we will soon be welcoming into the world! It was the first one I've ever helped plan before ... & we all know baby showers can be hit or miss! So, here is a recap of the planning, decor, and baby shower fun! I used browns, cow print, and burlap mixed with both light & bright pinks to go for a girly-western look.

I wish I could take credit for this sign because it's oh-so-cute! but, it was borrowed from Elizabeth's sister-in-law.


I ordered these invitations off Etsy. They say "Yee Haw! A little cowgirl is on her way. Let's shower her mommy before the big day!" I used brown paper bag colored envelopes but wanted to give them more of a girly look so I glued a white doiley on the top of each one. The doiley was folded so that it showed half on the front & half on the back.


I found these old frames at thrift stores. I painted them with some leftover craft paint & glossed over them with Mod Podge after the paint was dry.


Then I had Elizabeth send me some pictures of her ultra sounds & baby bump to put in the frames.


I also found these horseshoes & stars at the thrift store. I painted them with the matching paint as well.


Elizabeth was given this sign but it said "LIL BUCKAROO" ... I told her that wasn't quite fit for a girl & painted "LIL DARLIN" on the opposite side of it. That way if she has a boy down the road she can just flip it over!


I wanted the guests to have something to take with them after the shower, so I made some sugar cookies in the shapes of cowboy boots, hats, and horseshoes. I liked the way the boots turned out the best so a majority of the goodie bags just had the boot. I made the frosting using a recipe that included Karo syrup so that it dried hard & slightly glossy. I put some silver sprinkles on the spur & did the details with a white tube of frosting.

I used one of my favorite websites (dafont.com) & downloaded some western fonts to use for the gift tags. I printed them on light pink paper, mounted them to brown paper bags & ripped the edges. I used different patterns of ribbon paired with a piece of jute twine to tie the tags onto the clear bags.


One of the games we did was guess how many chocolates in the Mason jar. I used burlap & pink ribbon to cover the jar (& ended up doing a similar bow on the silverware jar). There were two other activities. One was a balloon relay where you had to waddle with a balloon between your legs and pass it off to your teammate. The other was a "Wishes for Baby Olson" survey where each guest filled out a card with their wishes for the new little one. I stole that idea off Pinterest. 


 Sweet tea & pink lemonade refreshments.


We used a burlap & cow print fabric on top for the table runners. 
We had light snacks of pink lemonade cupcakes, cookies, brownies, & cheesecake filled strawberries!


& of course some veggies and a pasta salad


We used a few card tables covered with a pink plastic table cloth, & added a piece of cow print fabric & some of the horseshoes & picture frames.


CONGRATS Elizabeth! It was so fun celebrating your new little cowgirl with you!!
Thank you for letting me be a part of all the baby shower fun!

Saturday, April 7, 2012

Western Crib - Before


My wonderful friends Elizabeth & Dan are expecting their first baby, a little girl! & what does every newborn need!? a crib! They bought this crib off of Craigslist and we decided we could re-do it to make it fit their unique western style. It's not quite finished yet but the picture above is after a coat of primer and the first coat of light brown. Originally we talked about sanding it down & staining it, but after I started to sand I discovered it was MDF which just wouldn't work. So, Plan B! I decided paint it a light brown followed by a dark brown & then rough it up with some sandpaper to give it a rustic look. I'm excited for it to be finished & hoping it turns out just how I have pictured in my mind!