Showing posts with label Power Tools. Show all posts

Tuesday, June 24, 2014

Farmhouse Desk

This old sturdy desk has been on my 'sprucin' up' list for quite some time. It's a piece that I cherish because it was given to me by an old family friend who is no longer with us. I could never part with it but she needed some fine tuning. When I was in my teenage years, I nothing short of carved (turns out permanent marker does just as much damage as a pocket knife) the names of all my 'sweethearts' all over the top. When I finally grew out of that stage (thank the Good Lord) I painted her white.


I got to work sanding the top piece to ditch all the white paint & years of true love markings.


I picked out an espresso stain - it said 'new' so I figured I had to give it a try. I usually use a walnut stain - which I will likely stick with in the future because only one coat of the espresso & it was still a bit darker than I desired. After the stain dried for an entire day, I sealed it with a layer of polyurethane clear coat. 


The bottom of the desk got another two layers of white paint. I debated sanding it all down & starting fresh, but aside from a few chips the existing paint really wasn't too bad. I would love to do something unique with the handles - thinking some rustic horse shoe pulls - but those are on standby until I commit to an idea I love.

Stay tuned for the 'after' ...

Thursday, September 6, 2012

Power Sanding

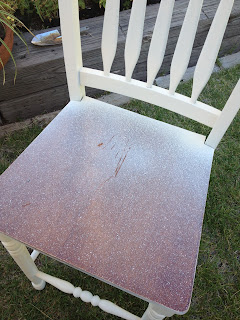
I love nothing more than a good power tool. They tend to make everything so much easier and save a lot of time. My latest project is this chair:


As you can see, I got a little over excited about my last tool (the paint sprayer) & didn't tape/cover the seat before I got to work. The spot where the back of the chair is got the most paint & needed the most sanding ... but it was also the most awkward part to sand. I will have to go back and do some by hand.


I used a 220 grain sandpaper which was just rough enough to strip the paint/previous stain but leave a smooth finish. I can't wait to apply the stain! I think I'm going to get all four chairs prepped before I start that process just so I can make them as uniform as possible.

Tuesday, August 21, 2012

Spray Painting (& not just out of a can!)

It's been almost a year since I bought this table & chairs off Craigslist with every intention to start the project long before now. However, last week I finally cashed in on a Christmas gift I had received - a gift card to Home Depot - & bought a new paint sprayer! (this is the coolest thing ever!)


I figured out quickly that you can't just pour in the paint & start spraying. There is a certain consistency the paint must be in order to actually come out of the sprayer and then form an even, non-speckled coat. Because the paint I bought had a latex base I just added a couple teaspoons of water & gave it a good stir. Had I any patience to actually read the instructions before I started, I would have figured this out a lot easier!

Also, had I any patience, I would have taped off the wood seat before getting started. Here are the "before" & "during" pictures. I need to add another coat of the ivory/cream color, sand the seat down & stain it. (And of course repeat all those steps on the other three chairs and the whole darn table! yikes! no wonder I didn't start this sooner!)

I'm a HUGE fan of the sprayer. After re-doing a crib, I quickly learned how much spray paint can add up! One bottle is about $4 - between the primer, first coat, & second coat I easily spent $50 on paint alone. A gallon of paint on the other hand is less than $20 & will easily be able to cover this entire table, all four chairs, & probably many more projects to come! I can't wait to post "after" pictures!